
How much delay should attendees expect during a live webinar?
When you stream a webinar, attendees will usually see and hear your presentation a few seconds after it happens. This delay is called stream latency.
Latency is the time it takes for your encoder to send the video to the streaming platform, for the platform to process it, and for the stream to reach each attendee's device.
How much delay should I expect?
The exact delay depends on your streaming platform, selected latency setting, internet connection, encoder, and each attendee's network connection.
As a general guide:
- YouTube Live with Low latency: Most viewers experience less than 10 seconds of delay.
- YouTube Live with Ultra-low latency: Most viewers experience less than 5 seconds of delay.
- Twitch with Low Latency mode: Delay is reduced compared with Normal Latency mode, but the exact delay varies by viewer and network conditions.
YouTube recommends Low latency for limited interaction and Ultra-low latency for highly interactive streams. Lower latency can increase buffering, especially for attendees with slower or unstable connections.
For most StealthSeminar webinars, a delay of several seconds is normal and should not affect the presentation.
Is latency a problem during a webinar?
Usually not. A webinar is generally a presentation rather than a real-time conversation. You can present your content normally while monitoring questions and comments separately.
For example, an attendee may submit a question while you are speaking, but you may not see it until several seconds later. This is expected behavior.
To make the delay easier for attendees to understand, consider telling them:
“There may be a short delay between the presentation and the chat. If you submit a question, please allow a few seconds for it to appear.”
If your event requires an immediate, back-and-forth conversation with every participant, a video conferencing platform such as Zoom or Microsoft Teams may be a better fit than a live broadcast.
Recommended YouTube Live setting
For most webinars, we recommend Low latency. It provides a good balance between responsiveness and stream stability.
Choose Ultra-low latency only when near real-time interaction is important, such as:
- Live audience questions
- Polls that require immediate responses
- Demonstrations that depend on rapid feedback
- Interactive coaching or interviews
Ultra-low latency can increase buffering, so test it before using it for an important event.
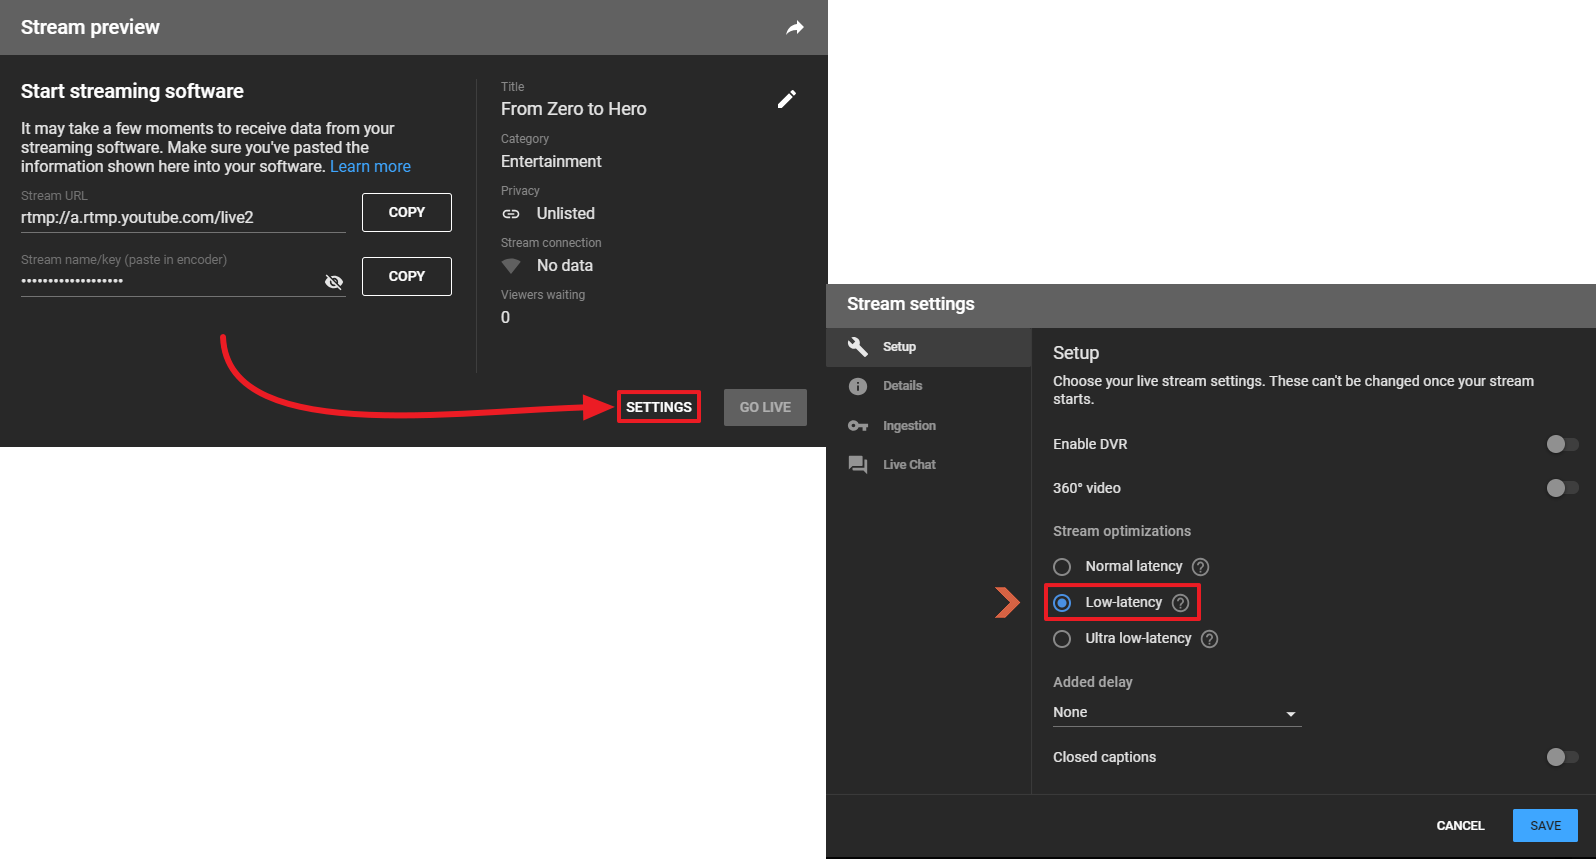
How to change the latency setting on YouTube Live
- Open YouTube Studio.
- Select Create, then Go live.
- Open the relevant live stream.
- Select the Stream or Manage tab.
- Open Stream settings.
- Under Stream latency, choose one of the following:
- Normal latency
- Low latency
- Ultra-low latency
- Save your changes.
For most StealthSeminar webinars, select Low latency.
YouTube's official guide explains the available latency settings and the trade-off between lower delay and increased buffering: Understand live streaming latency.
Recommended Twitch setting
Twitch generally enables Low Latency mode by default. This reduces the delay between your broadcast and attendees compared with Normal Latency mode.
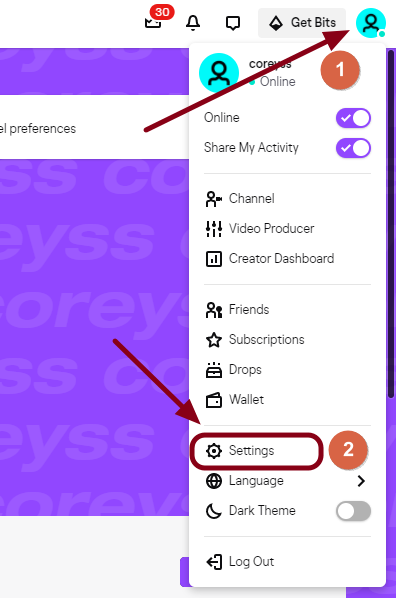
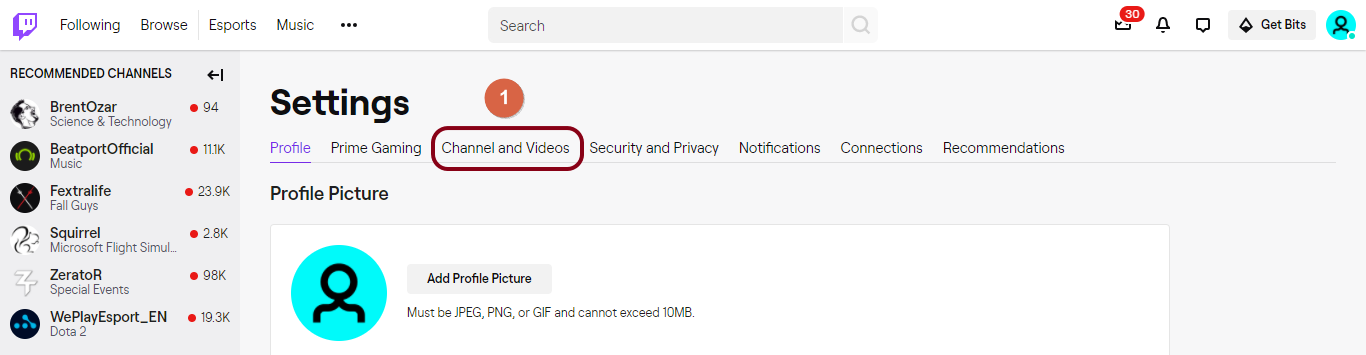
To check or change the setting:
- Open your Twitch Creator Dashboard.
- Select the menu icon.
- Open Preferences, then select Stream.
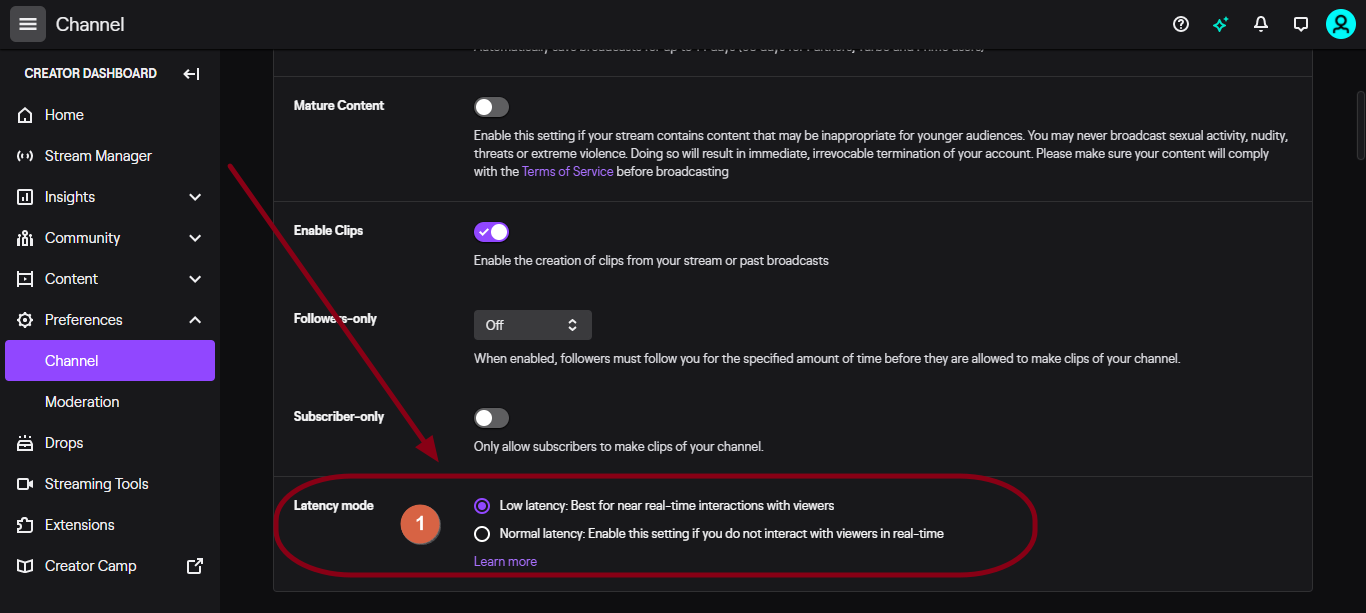
- Find Latency mode under Stream Key & Preferences.
- Select Low latency.
- Save your changes.
- Restart your stream.
Twitch requires the stream to be restarted before a latency setting change takes effect. If you experience buffering or unstable playback, try switching to Normal Latency mode.
3. Scroll until you find Latency Mode, choose Low Latency.
Factors that can increase delay
Latency can be affected by:
- Your upload speed and network stability
- The streaming platform's processing time
- The selected latency setting
- Attendee bandwidth and Wi-Fi quality
- Buffering on the attendee's device
- Network congestion
- Heavy internet usage while streaming
Before your webinar, avoid using the same internet connection for high-bandwidth activities such as:
- Uploading large files
- Watching or streaming high-resolution video
- Gaming or downloading software
- Running cloud backups
- Hosting another live stream
Whenever possible, use a wired internet connection for the computer running OBS or your broadcasting software.
How to test your webinar delay
Before your event:
- Start a private or unlisted test stream.
- Open the stream on a separate device or network.
- Say a short phrase, such as “Test message.”
- Measure the time between saying the phrase and hearing it on the attendee device.
- Test the chat so you understand how long attendee questions take to appear.
- Confirm that your audio and video remain stable for several minutes.
A test is especially important when using Ultra-low latency, because network problems and buffering can affect viewers more quickly.
Important reminder
A small delay is normal for live streaming. It does not mean that your StealthSeminar webinar is malfunctioning.
For the best experience:
- Use Low latency for most webinars.
- Use Ultra-low latency only when real-time interaction is essential.
- Tell attendees to expect a short delay.
- Allow a few seconds before responding to chat questions.
- Test your stream before the live event.
- Use a stable, preferably wired, internet connection.