
How Does Daily Repeat Schedule Work?
Daily Repeat Schedule lets you offer the same webinar at specific times on specific days of the week. For example, you can run it at 12:00 PM and 9:00 PM Monday through Friday, then offer one 5:00 PM session on Saturday and Sunday.
Use it when you want attendees to choose from recurring times instead of creating each date one at a time.
Step-by-Step Configuration Instructions
Step 1: Open the webinar schedule
- Navigate to Webinar setup page > Scheduling.
- Set Repeat schedule to Yes, repeat.
- Review Maximum repeat time. This controls how many upcoming times can be shown on the viewer-facing page. You can enter a number from 1 to 30.
Step 2: Choose the scheduling timezone
- Find Scheduling timezone.
- Select Attendee timezone if each attendee should see the session time in their own local timezone.
- Select Webinar’s timezone if everyone should see the same scheduled wall-clock time in the webinar’s configured timezone.
With Attendee timezone selected, the displayed time may be different for each attendee. Near midnight, the local calendar date may also be different.
Live and Hybrid webinars use the webinar’s timezone for scheduling.
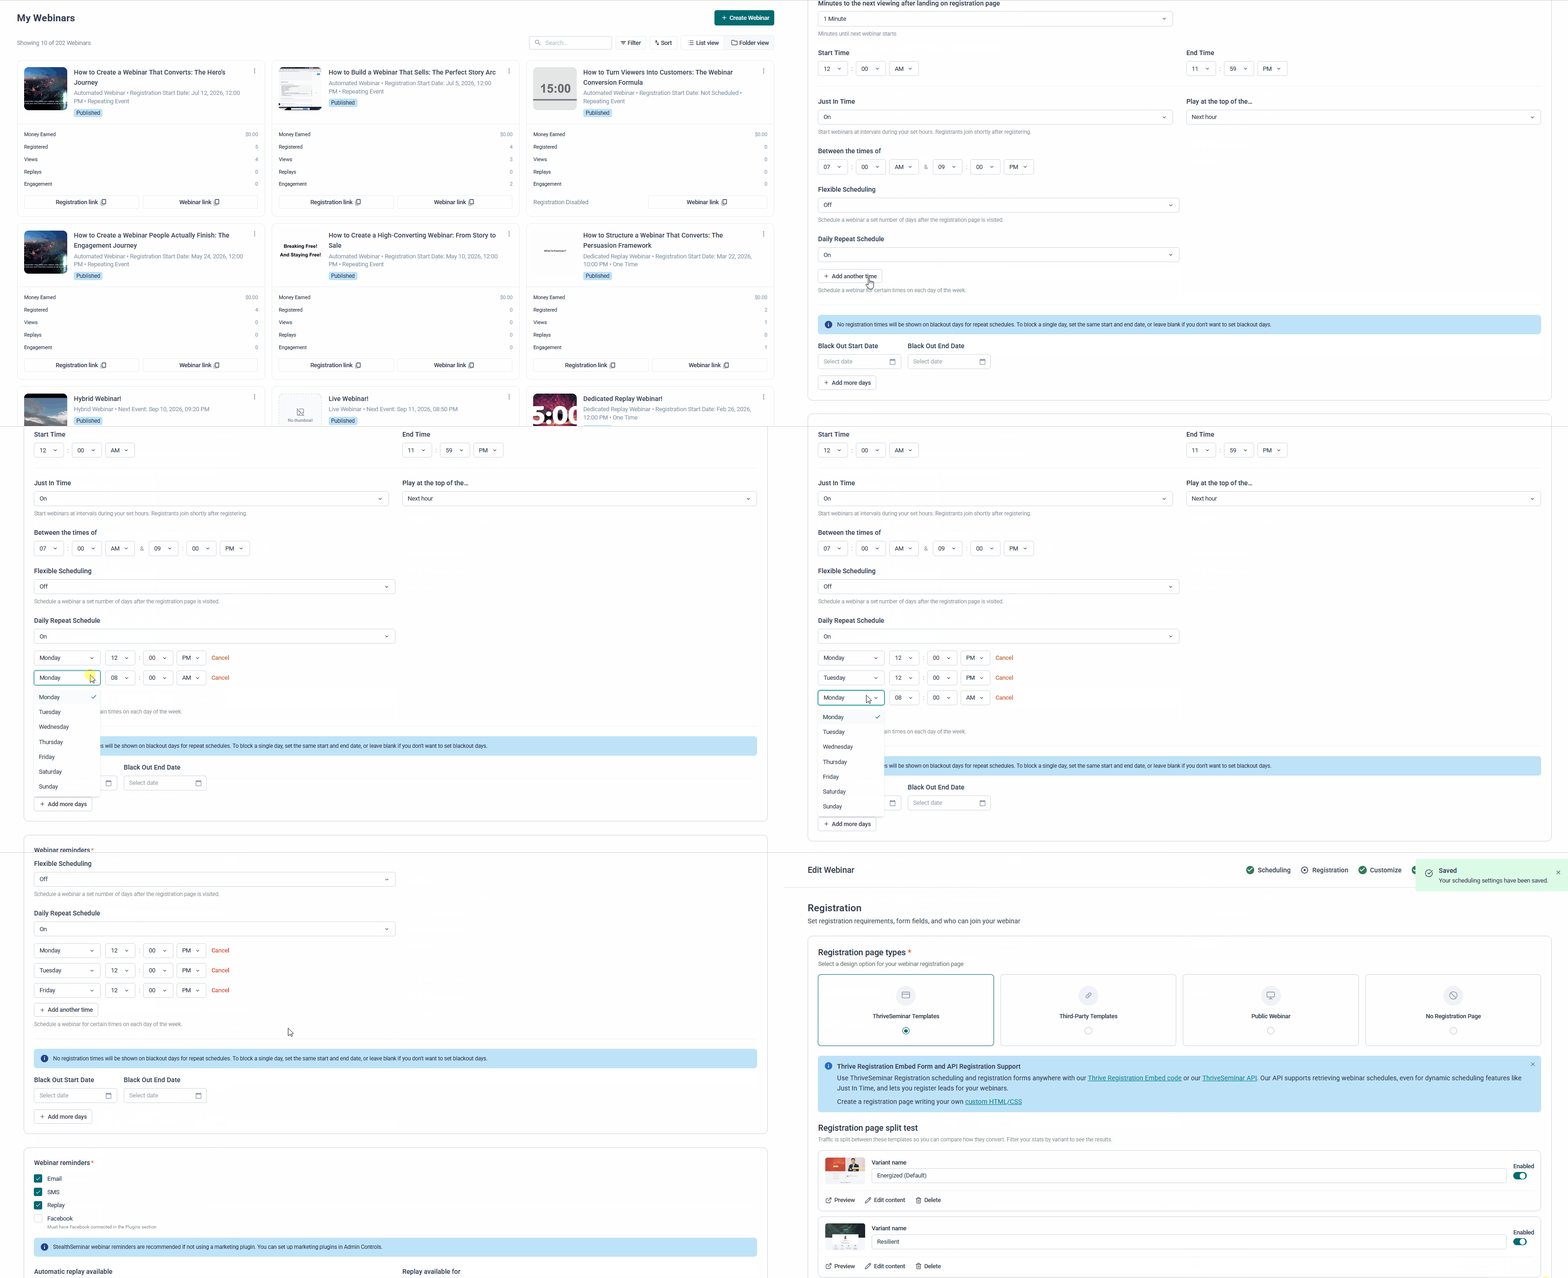
Step 3: Turn on Daily Repeat Schedule
- Find Daily Repeat Schedule.
- Set it to On.
- If no schedule row appears yet, select Add another time to create the first row.
Step 4: Add each weekday and time
- In a schedule row, open the weekday dropdown and select the day you want.
- Select the time for that day.
- Select Add another time to add another recurring time.
- Repeat these steps for each weekday and time you want to offer.
- Select Cancel beside a row to remove it.
You can add more than one time on the same weekday, but each weekday-and-time combination must be unique.
Step 5: Optionally block dates
- In Scheduling > Black Out Dates, set Black Out Start Date.
- Set Black Out End Date.
- To block one day, use the same date in both fields.
- Select Add more days to add another blackout range.
When repeat scheduling is enabled, sessions that fall within a blackout range are not offered on those dates. The next eligible occurrence can appear instead.
Step 6: Save and preview the schedule
- Select Save & Continue at the bottom of the page. If you want to keep the webinar as a draft, select Save to draft instead.
- Open the viewer-facing registration page in a private or incognito browser window. For a Public Webinar, open its public webinar page instead.
- Confirm that the upcoming options match the weekdays and times you entered.
- Check that the number of options shown matches Maximum repeat time when enough eligible sessions are available.
Prerequisites and Upstream Requirements
Before you start:
- Create the webinar you want to schedule.
- Make sure the webinar uses a recurring schedule. Daily Repeat Schedule appears when Repeat schedule is set to Yes, repeat.
- Decide whether attendees should see times in their own timezones or in the webinar’s timezone.
- If you plan to block specific dates, have those dates ready.
How to test the setup:
Use this quick test before sending traffic to the viewer-facing page:
- Add two different Daily Repeat entries, such as Monday at 12:00 PM and Wednesday at 3:00 PM.
- Set Maximum repeat time high enough to display both entries.
- Save with Save & Continue.
- Open the registration page, or the public webinar page for a Public Webinar, in an incognito window.
- Confirm that each test entry appears when its next occurrence is in the future, is inside the webinar’s active date range, is not blacked out, and fits within the maximum number of upcoming times.
- Confirm that the displayed time and date match the selected scheduling timezone.
The viewer-facing page combines eligible upcoming times from the scheduling options you have enabled. This means a Daily Repeat entry may not appear in the first set of options if other scheduling methods are also active or if the entry is outside the current date and time window.
Common Issues & Solutions
| Symptom | Root Cause | Resolution |
|---|---|---|
| Daily Repeat Schedule is not visible | Repeat schedule is not set to Yes, repeat, or the webinar is a Dedicated Replay. | 1. Open Webinar setup page > Scheduling. 2. Set Repeat schedule to Yes, repeat. 3. Dedicated Replay webinars do not use Daily Repeat Schedule. |
| The schedule will not save after Daily Repeat Schedule is turned on | Daily Repeat Schedule is enabled but no weekday/time row has been added. | Add at least one weekday and time, then save again. The validation message is: Add at least one time to use the Daily Repeat Schedule. |
| The schedule will not save because of duplicate times | The same weekday and time has been entered more than once. | Review each row and remove or change the duplicate. The validation message is: Daily repeat times must be unique. |
| A blackout range will not save | Only one end of the blackout range has been filled in. | Add both a start and end date, or leave both fields blank. |
| An expected session does not appear | The session may be outside the active date and time window, inside a blackout range, beyond the Maximum repeat time limit, or behind another eligible upcoming time. | Check the webinar start and registration dates, review blackout ranges, increase Maximum repeat time if needed, and confirm the scheduling timezone. |
| Attendees see different clock times or dates | Attendee timezone is selected. | Select Webinar’s timezone when everyone should see the same scheduled wall-clock time. |